RGB7 Bay Timer
Full-color, Wi-Fi-enabled self-serve car wash bay timer. Connector compatible with the Dixmor LED 7.
Read all instructions before installing. Keep this manual with your site records.
Record your timer
| Serial number | |
| Setup network name (POGO-Wash-XXXX) | |
| Wash location and bay number | |
| Date installed / installed by | |
| Date of purchase / order number | |
| Firmware version at install |
Manual revision: October 2026. Model RGB7.
Contents
- Important Safety Information
- Product Overview
- Installation
- Setup Mode and the Setup Button
- Settings Guide
- Wi-Fi and POGOWash.com
- How the Timer Operates
- Commissioning Checklist
- Care and Maintenance
- Troubleshooting
- Factory Reset
- Regulatory Information
- Limited Warranty
- Software, Data and Online Services
- Trademarks and Legal Notices
- Getting Support
1. Important Safety Information
This manual uses the following signal words:
Before installing or servicing
- Installation should be performed by a qualified installer or electrician in accordance with the National Electrical Code (NEC), the Canadian Electrical Code (CEC) where applicable, and all local codes.
- Power the RGB7 only from a 24 V AC transformer. A listed Class 2 transformer is recommended. Do not connect the timer to 120/240 V AC or to a DC supply.
- Verify the harness pinout against Section 3 before plugging in. Connecting a harness wired for a different timer model can damage the timer and connected equipment.
- Car wash bays are wet locations. Mount the timer so the faceplate seals against the wall or panel, route wiring so water drains away from the connector, and do not mount the timer where it can be directly sprayed by a wand.
- Do not open the timer housing, modify the circuit board or install unapproved firmware. There are no user-serviceable parts inside other than the replaceable faceplate. Modifications void the warranty and may void the user's authority to operate the equipment (see Section 12).
- Do not use the timer if the housing, faceplate, connector or cable is damaged.
2. Product Overview
The RGB7 is a coin, bill and card bay timer with a full-color LED display. It replaces a Dixmor LED 7 using the same 10-position, 3.96 mm Molex connector and pinout, so in most bays it plugs into the existing harness with no rewiring. Settings are made from a phone, tablet or computer through the timer's built-in setup page. Normal timer operation does not need an internet connection. When connected to Wi-Fi, the timer can also be managed through your account at POGOWash.com.
What's in the box
- RGB7 Bay Timer
- Molex connector with 16" cable (for new installations)
- This owner's manual
If anything is missing or damaged, contact POGO Engineering before installing (see Section 16).
Key features
- Customizable full-color messages, colors and animations
- Count-down (coin/bill) and count-up (card) operation
- Power-loss recovery and magnetic tamper detection
- Remote activation and revenue reporting via POGOWash.com
- Field-replaceable Lexan (polycarbonate) faceplate
Specifications
| Item | Specification |
|---|---|
| Model | RGB7 |
| Application | Self-serve car wash bay timer |
| Input power | 24 V AC, 50/60 Hz, |
| Timed-load output rating | 24 V AC, 1 A continuous (pilot duty: contactor coils, solenoid valves). Not for direct motor loads. |
| Payment inputs | Coin, bill and card pulse inputs, compatible with standard pulse-output acceptors and card readers |
| Connector | 10-position, 3.96 mm pitch Molex; pinout matches the Dixmor LED 7 |
| Mounting | 4-tab face mount |
| Wireless | Wi-Fi 2.4 GHz, IEEE 802.11 b/g/n Requires a network name (SSID) used only on 2.4 GHz. 5 GHz networks, and networks that share one name across 2.4 GHz and 5 GHz, are not supported. |
| Warranty | One-year limited warranty (see Section 13) |
3. Installation
Tools and materials
- Screwdriver or nut driver for your bay's mounting hardware
- Multimeter (recommended, to confirm 24 V AC and the harness pinout)
- A phone, tablet or laptop with Wi-Fi, for setup
- For new installations only: wire connectors suitable for damp locations
Replacing a Dixmor LED 7
- Turn off and lock out power to the bay controls.
- Remove the old timer from the wall or panel and unplug its Molex connector. Leave the harness in place.
- Inspect the harness connector. Replace it if pins are corroded, burned or loose.
- Plug the harness into the RGB7. The connector is keyed and only fits one way. Do not force it.
- Mount the RGB7 using its 4 mounting tabs and your existing hardware. Make sure the faceplate sits flat and the setup button access hole stays reachable.
- Restore power. The display lights up within a few seconds.
- Continue to Section 4 to configure pricing and display settings.
New installation
Use the included Molex connector with 16" cable. Connect each lead to your bay equipment according to the pinout below and your coin acceptor, bill acceptor or card reader instructions. Make all splices inside an enclosure or with connectors rated for damp locations.
Connector pinout (rear view)
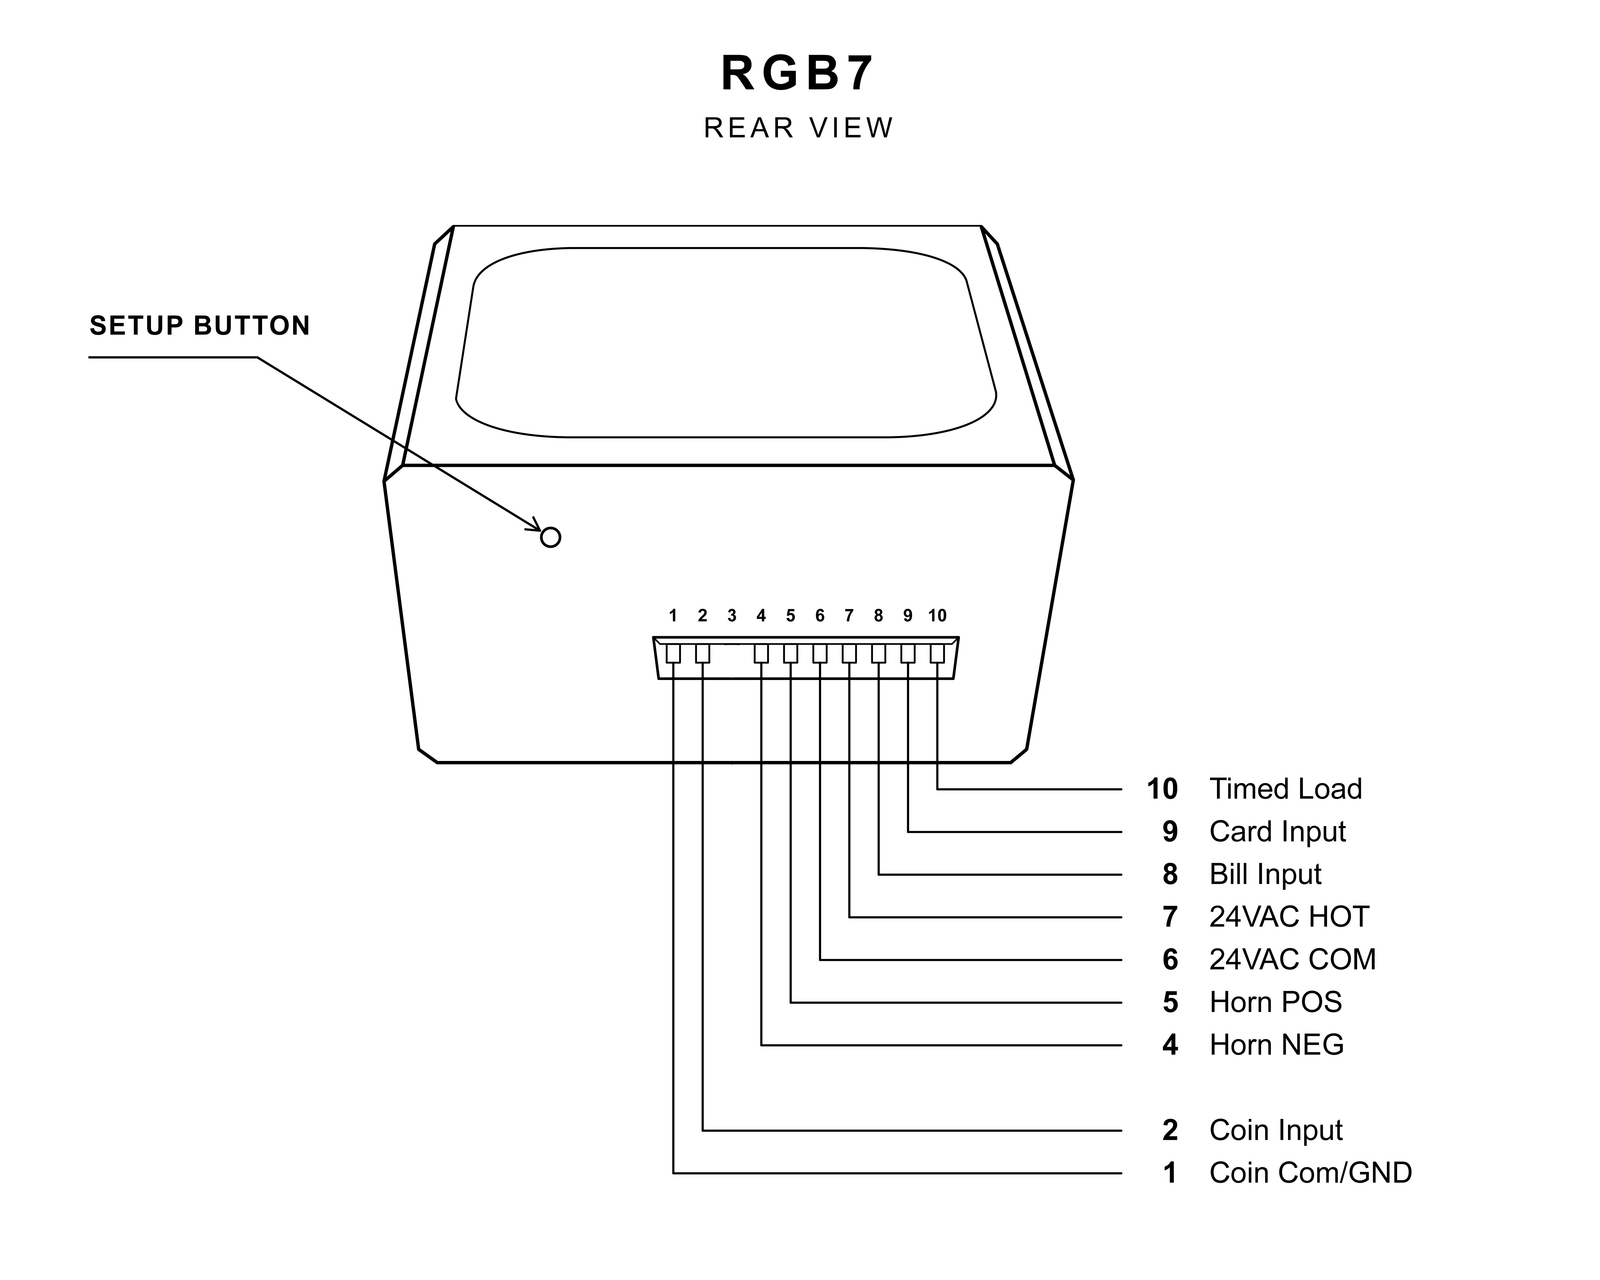
| Pin | Function | Connects to |
|---|---|---|
| 1 | Coin COM / GND | Coin acceptor common (signal ground) |
| 2 | Coin input | Coin acceptor pulse output |
| 3 | (No pin) | Key position. Nothing connects here. |
| 4 | Horn NEG (−) | Horn negative |
| 5 | Horn POS (+) | Horn positive |
| 6 | 24 V AC COM | Transformer common |
| 7 | 24 V AC HOT | Transformer hot |
| 8 | Bill input | Bill acceptor pulse output |
| 9 | Card input | Card reader start/pulse output |
| 10 | Timed load | Pump or valve control (24 V AC switched output while the bay is running) |
4. Setup Mode and the Setup Button
All settings are made through a setup page served by the timer itself. When setup mode is on, the timer creates its own Wi-Fi network. You don't need internet access or an app.
Opening the setup page
- With the timer powered for at least 5 seconds, press the setup button once through the access hole on the back of the timer. Use a non-conductive tool such as a plastic stylus.
- A single red dot in the bottom-right corner of the display shows that setup mode is on.
- On your phone, tablet or laptop, join the Wi-Fi network named
POGO-Wash-XXXX.XXXXis unique to your timer, so write it on the record page at the front of this manual. - The setup page usually opens by itself. If it doesn't, open a web browser and go to
http://192.168.4.1. - Make your changes and save. The timer applies saved settings right away.
Setup mode turns off on its own after about 10 minutes without activity on the setup page, as long as no wash is running. The timer restarts and returns to normal operation. Press the setup button again if you need more time.
Setup button functions
| Action | Result |
|---|---|
| Press once | Turns on setup mode. |
| Press 3 times within 5 seconds | Clears the coin/bill wash that's running and returns the timer to its greeting. |
| Hold for 5 seconds | The display shows a factory-reset countdown. Release the button now to cancel. |
| Hold for 10 seconds | Factory reset. All settings, including Wi-Fi and passwords, go back to factory defaults and the timer restarts. |
The button is ignored for the first 5 seconds after power-up, to prevent accidental presses during startup.
You can explore the setup page before installing at pogowash.com/setupPreview. Once your timer is connected to Wi-Fi and linked to your account, the same settings can also be changed remotely from your POGOWash.com dashboard.
5. Settings Guide
The setup page groups settings as follows. Settings may be added or renamed in firmware updates.
Pricing and payment
| Setting | What it does |
|---|---|
| Coin / Bill / Card Value | Dollar value credited for each pulse from that input. |
| Seconds Per Coin / Bill Pulse | Wash time added for each coin or bill pulse. |
| Seconds Per Card Pulse | Time-to-price scaling used to calculate count-up (card) charges. |
| Cost to Start | Minimum amount that must be inserted before a count-down wash starts. |
| Minimum Card Charge | Lowest amount charged for a count-up card wash. |
| Allow Count-Down Card Pulses | Lets short card pulses add value like coins, for card readers that send pulses. |
Restart, power and tampering
| Setting | What it does |
|---|---|
| Allow Restart / Seconds to Restart | Gives the customer a window to add money after time runs out without paying the full Cost to Start again. Includes a restart message and color. |
| Power Loss Detection | Saves the time remaining during a wash, so the customer's time is restored after a power interruption. |
| Magnetic Tampering Detection | Detects magnets held near the timer to fake pulses and shows a tampering message. |
Display and messages
| Setting | What it does |
|---|---|
| Display Brightness, Display Color, Scroll Speed, Colon & Decimal Color | Overall appearance of the display. |
| Greeting Message | What the idle timer shows: price, scrolling text or animation, with up to three colors. |
| Partial Payment Display | Shows the amount inserted so far or the amount still needed to start. |
| Count-Down / Count-Up Display | Shows time, money, or both while a wash runs, plus an optional repeating message and its interval. |
| Card messages | Verifying, approved and declined card messages and colors. |
| Finished messages | End-of-wash messages and colors for count-down and count-up washes. |
| Aux LED Settings | Controls optional external LED lighting connected to the timer. Leave disabled unless external LEDs are installed. |
Horn
| Setting | What it does |
|---|---|
| Horn Type | Pulsed, constant or off. |
| Horn Warning Trigger | Seconds remaining when the low-time warning horn sounds. |
| Horn Duration | How long the warning horn sounds. |
| Chirp Horn On Coin/Bill Pulse | Short horn chirp to confirm each coin or bill. |
Online settings
Wi-Fi, remote activation, revenue logging and firmware update settings are described in Section 6.
6. Wi-Fi and POGOWash.com
Wi-Fi is optional. Without it, the timer works as a standalone timer using the settings saved on it.
Connecting to Wi-Fi
- Open the setup page (Section 4) and find WiFi Settings.
- Turn on Enable Wifi and enter your network name and password exactly. Both are case-sensitive. The network name must be used only on 2.4 GHz. Many routers broadcast 2.4 GHz and 5 GHz under the same name, and the timer can't connect reliably to those networks. If yours does, give the 2.4 GHz band its own name in your router settings (for example, add "-2G" to the end) or set up a separate 2.4 GHz guest network, and enter that name here.
- Save. While setup mode is on, the bottom-left dot on the display shows Wi-Fi status: green when connected to Wi-Fi, red when not. A second green dot next to it means the timer is also connected to the POGOWash server.
Leave the WebSocket Server settings at their defaults unless POGO Engineering support asks you to change them.
Adding the timer to your account
Sign in or create an account at www.pogowash.com. Go to Devices > Add Device and enter the serial number found on your timer.
Online features
| Feature | Description |
|---|---|
| Remote Activation | Start a wash from your dashboard, for example to assist a customer or wash down the bay. Set a Remote Activation Password on the timer and enter the same password on POGOWash.com. The timer ignores remote starts that don't include the correct password. Choose a strong password and don't reuse it elsewhere. |
| Revenue Logging | Sends coin, bill and card pulse records to your account for revenue reports and coin-vault cleanout tracking. |
| Wash codes | Lets customers redeem prepaid wash codes on connected timers. |
| Automatic Firmware Updates | Lets the timer download approved firmware from POGO Engineering. Set Allowed Update Time to a time when the wash is normally closed. A timer won't update during a wash. Updates can also be started from your dashboard. |
7. How the Timer Operates
Count-down (coin and bill)
Each coin or bill pulse adds value and time. When the inserted amount reaches Cost to Start, the timed-load output turns on and the display counts down. Customers can add money at any time to add time. The horn warns when time is low, if enabled. When time runs out the output turns off, and if Allow Restart is on, the customer has the restart window to add more money.
Count-up (card)
When a card reader starts a transaction, the display shows the verifying and approved messages, then the timed-load output turns on and the display counts up time or amount spent. When the card transaction ends, the output turns off and the charge is based on elapsed time, but never less than the Minimum Card Charge.
Power interruption
With Power Loss Detection on, a count-down wash that was running when power failed resumes with its remaining time once power returns. Settings are always kept through a power loss.
8. Commissioning Checklist
Complete these checks before returning the bay to customers:
- The display lights up and shows your greeting.
- Pricing, time per pulse and Cost to Start are correct for your posted prices.
- A real coin and bill each add the expected amount and time.
- The pump or valve turns on when the wash starts and off when time runs out.
- The horn sounds at the warning time, if used.
- The card reader starts and ends a count-up wash and charges correctly, if used.
- If online: the timer appears on your POGOWash.com dashboard and test pulses appear in revenue logging.
- Fill in the record page at the front of this manual.
The setup page also includes service tools for testing the LEDs, horn, timed load and simulated inputs.
9. Care and Maintenance
- Clean the faceplate with a soft cloth, water and mild dish soap. Rinse with clean water.
- Do not use solvents, ammonia-based glass cleaners, tire or wheel cleaners, acid or high-pH chemicals, or abrasive pads on the faceplate. These can cloud or crack polycarbonate.
- Do not aim a high-pressure wand at the timer.
- Check the connector and harness once a year for corrosion or loose pins.
- Replacement faceplates are available from POGO Engineering. A scratched or damaged faceplate can be replaced in the field without replacing the timer.
10. Troubleshooting
| Problem | Possible cause | What to do |
|---|---|---|
| Display stays dark | No 24 V AC, connector not fully seated, or wrong harness pinout | Measure 24 V AC between pins 6 and 7 at the harness. Reseat the connector. Compare the harness with the pinout in Section 3. |
| Setup network doesn't appear | Button pressed within 5 seconds of power-up, or setup mode timed out | Wait 5 seconds after power-up and press the button again. Look for the red dot in the bottom-right corner. |
| Setup page doesn't open | Phone switched back to mobile data or another network | Stay connected to POGO-Wash-XXXX and go to http://192.168.4.1. Turning off mobile data temporarily can help. |
| Coins or bills don't register | Wiring, acceptor pulse settings, or value set to 0 | Check pins 1, 2 and 8 and the acceptor's pulse output. Check the Coin/Bill Value settings. |
| Money registers but the bay doesn't start | Cost to Start not reached, or timed-load wiring | Check Cost to Start. Check pin 10 and the contactor or relay coil. |
| Horn doesn't sound | Horn off, warning time set to 0, or wiring | Check the horn settings and pins 4 and 5. |
| Won't connect to Wi-Fi | 5 GHz network, a network name shared by 2.4 GHz and 5 GHz, wrong password, or weak signal | Use a network name that's only on 2.4 GHz (see Section 6) and re-enter the name and password. Improve the signal with an access point or extender near the bay. |
| Not showing on the dashboard | Not linked to your account, or server connection down | Confirm both status dots are green in setup mode, then follow Section 6 to link the timer. |
| "Tampering" message | Magnet detected near the timer | Inspect the bay for tampering devices. Turn the detection off only if a nearby fixture causes false alarms. |
| Settings lost | Setup button held 10 seconds (factory reset) | Reconfigure the timer. Press the button briefly when entering setup. |
11. Factory Reset
A factory reset erases all settings, including pricing, messages, the Wi-Fi network and the remote activation password.
- With the timer powered for at least 5 seconds, press and hold the setup button.
- After 5 seconds the display shows a reset countdown. Release now to cancel.
- Keep holding until 10 seconds have passed. The timer resets and restarts.
- Reconfigure the timer (Sections 4 to 6) and repeat the commissioning checklist.
If you sell or transfer the timer, do a factory reset first and remove it from your POGOWash.com account.
12. Regulatory Information
FCC (United States)
Contains FCC ID: 2AC7Z-ESPS3WROOM1
This device complies with Part 15 of the FCC Rules. Operation is subject to the following two conditions: (1) this device may not cause harmful interference, and (2) this device must accept any interference received, including interference that may cause undesired operation.
Changes or modifications not expressly approved by POGO Engineering LLC could void the user's authority to operate the equipment.
Note: This equipment has been tested and found to comply with the limits for a Class B digital device, pursuant to Part 15 of the FCC Rules. These limits are designed to provide reasonable protection against harmful interference in a residential installation. This equipment generates, uses and can radiate radio frequency energy and, if not installed and used in accordance with the instructions, may cause harmful interference to radio communications. However, there is no guarantee that interference will not occur in a particular installation. If this equipment does cause harmful interference to radio or television reception, which can be determined by turning the equipment off and on, the user is encouraged to try to correct the interference by one or more of the following measures:
- Reorient or relocate the receiving antenna.
- Increase the separation between the equipment and receiver.
- Connect the equipment into an outlet on a circuit different from that to which the receiver is connected.
- Consult the dealer or an experienced radio/TV technician for help.
RF exposure: This equipment complies with FCC radiation exposure limits set forth for an uncontrolled environment. It should be installed and operated with a minimum distance of 20 cm (8 in) between the radiator and your body, and must not be co-located or operated with any other antenna or transmitter.
Responsible party (Supplier's Declaration of Conformity): POGO Engineering LLC, 16070 White rd, Green Ridge, MO 65332, contact@pogowash.com.
ISED (Canada)
Contains IC: 7145-ESP32S3. CAN ICES-003(B) / NMB-003(B)
This device contains licence-exempt transmitter(s)/receiver(s) that comply with Innovation, Science and Economic Development Canada's licence-exempt RSS(s). Operation is subject to the following two conditions: (1) this device may not cause interference; and (2) this device must accept any interference, including interference that may cause undesired operation of the device.
L'émetteur/récepteur exempt de licence contenu dans le présent appareil est conforme aux CNR d'Innovation, Sciences et Développement économique Canada applicables aux appareils radio exempts de licence. L'exploitation est autorisée aux deux conditions suivantes : (1) l'appareil ne doit pas produire de brouillage; (2) l'appareil doit accepter tout brouillage radioélectrique subi, même si le brouillage est susceptible d'en compromettre le fonctionnement.
This equipment complies with ISED radiation exposure limits set forth for an uncontrolled environment and should be installed and operated with a minimum distance of 20 cm between the radiator and your body. Cet équipement est conforme aux limites d'exposition aux rayonnements d'ISDE établies pour un environnement non contrôlé et doit être installé et utilisé à une distance minimale de 20 cm entre le radiateur et votre corps.
Disposal
This product contains electronic components. Do not dispose of it in household trash. Recycle it through an electronics recycling program in accordance with local regulations, or contact POGO Engineering for recycling options.
13. Limited Warranty
What is covered and for how long
POGO Engineering LLC ("POGO Engineering") warrants to the original purchaser that the RGB7 Bay Timer will be free from defects in materials and workmanship under normal use for one (1) year from the date of original purchase (the "Warranty Period").
What we will do
If a covered defect appears during the Warranty Period, POGO Engineering will, at its option, repair the timer, replace it with a new or refurbished unit of equal or better function, or refund the purchase price. Replacement units and parts are warranted for the remainder of the original Warranty Period or 90 days, whichever is longer.
What is not covered
- Damage caused by improper installation, incorrect wiring, a harness wired for a different timer model, or connection to the wrong voltage or power source.
- Damage from lightning, power surges, flooding, fire, freezing, or water entry caused by improper mounting or sealing.
- Damage from accident, abuse, vandalism, theft, or chemicals not recommended in Section 9.
- Units that have been opened, modified or repaired by anyone other than POGO Engineering, or loaded with firmware not supplied by POGO Engineering.
- Cosmetic wear, including scratches to the faceplate, and normal wear of consumable parts.
- Labor, service calls, bay downtime, shipping to POGO Engineering, and removal or reinstallation costs.
- Interruptions of Wi-Fi, internet service or POGOWash.com online services.
How to get warranty service
Contact POGO Engineering through the contact form at www.pogowash.com or at contact@pogowash.com before returning a product. Provide the serial number, proof of purchase and a description of the problem. If service is approved, you will receive return instructions. Products returned without authorization may be refused. POGO Engineering will cover the cost of return shipping for authorized warranty replacements.
Limitations
THIS LIMITED WARRANTY IS THE ONLY EXPRESS WARRANTY FOR THIS PRODUCT. ANY IMPLIED WARRANTIES, INCLUDING THE IMPLIED WARRANTIES OF MERCHANTABILITY AND FITNESS FOR A PARTICULAR PURPOSE, ARE LIMITED IN DURATION TO THE WARRANTY PERIOD. TO THE MAXIMUM EXTENT PERMITTED BY LAW, POGO ENGINEERING IS NOT LIABLE FOR INCIDENTAL, SPECIAL, INDIRECT OR CONSEQUENTIAL DAMAGES, INCLUDING LOST REVENUE, LOST PROFITS, BAY DOWNTIME, OR DAMAGE TO OTHER EQUIPMENT, ARISING FROM THE USE OR INABILITY TO USE THIS PRODUCT. POGO ENGINEERING'S TOTAL LIABILITY SHALL NOT EXCEED THE PURCHASE PRICE OF THE PRODUCT.
Some states and provinces do not allow limitations on how long an implied warranty lasts, or the exclusion or limitation of incidental or consequential damages, so the above limitations or exclusions may not apply to you. This warranty gives you specific legal rights, and you may also have other rights which vary from state to state or province to province.
14. Software, Data and Online Services
Firmware
The timer's firmware is licensed, not sold, for use with this timer only. You may not copy, modify, reverse engineer or redistribute it except as permitted by law or by the open-source licenses below. POGO Engineering may release firmware updates to fix problems, improve security or add features.
Open-source software
This product includes open-source software, including components of the Espressif ESP32 Arduino core and ESP-IDF, FastLED, ArduinoJson and ArduinoWebsockets, each provided under its own license (such as MIT, Apache 2.0 or LGPL 2.1). Where a license requires it, POGO Engineering will provide the corresponding source code on request for at least three years from the date of purchase. Contact contact@pogowash.com.
Data collected by connected timers
When Wi-Fi and online features are turned on, the timer sends POGO Engineering its serial number, firmware version, network status, settings, and payment pulse and revenue records, so that remote management, reporting and firmware updates work. The timer does not collect customers' names or card numbers; card payments are processed by your card reader provider. Data is handled as described in the POGOWash.com Privacy Policy and Terms of Service at www.pogowash.com. You can stop all data transfer by turning Wi-Fi off in the setup page.
Online services
Online features depend on your Wi-Fi, internet service and POGOWash.com, and may be changed, suspended or discontinued. The timer continues to operate as a standalone timer without them. You are responsible for keeping your account credentials and remote activation password secure.
15. Trademarks and Legal Notices
Dixmor is a trademark of its respective owner. POGO Engineering LLC is not affiliated with or endorsed by Dixmor. The name is used only to describe connector and pinout compatibility. Wi-Fi is a registered trademark of the Wi-Fi Alliance. Molex is a trademark of Molex, LLC. All other trademarks belong to their respective owners.
Information in this manual is subject to change without notice. The current version is available at www.pogowash.com. POGO Engineering is not responsible for damage or injury resulting from installation or use contrary to these instructions.
© 2026 POGO Engineering LLC. All rights reserved. Designed and built in the USA.
16. Getting Support
| Manufacturer | POGO Engineering LLC |
| Address | 16070 White Rd, Green Ridge, MO 65332 |
| Website | www.pogowash.com (contact form, manuals, pinout diagrams and setup preview) |
| contact@pogowash.com |
When contacting support, please have your serial number, firmware version and a photo of your wiring ready.